
Reference desk
How AIM buddy icons were chosen, made, installed, and seen
A source-based guide to 48×48 and 50×50 icons, file-size limits, animated GIFs, transparency, and one-click AIM installation.
Were AIM buddy icons 48×48 or 50×50?
Both sizes belong in the historical record. The preserved Adium help page describes AIM icons between 48×48 and 50×50 pixels. The Gaim FAQ also names those two sizes when troubleshooting display problems. These documents describe particular clients; they do not establish one rule for every AIM release.
That distinction matters when preserving a file. A 50×50 original should not be silently converted to 48×48 to fit a remembered convention. The archive records the actual dimensions of each stored image.
What do the surviving specifications actually say?
| Evidence | Documented behavior | Scope |
|---|---|---|
| Gaim FAQ | Under 4 KB; GIF and JPEG recommended for compatibility; 48×48 or 50×50 suggested. | Gaim’s AIM/ICQ advice, not a version-by-version AOL specification. |
| Adium help | Animated GIFs; 48–50 pixels square; resizing and some image-picking paths lose animation. | The documented Adium workflow. |
| node-oscar implementation | Icon data limited to 7,168 bytes, or 7 KiB. | A third-party OSCAR implementation; not proof of the limit in every official AIM client. |
| Neopian Times, week 95 | AIM rejected oversized icons; Neopets reduced them and added transparent borders. | A contemporary compatibility report, without a numerical limit. |
The often-repeated “7 KB” answer needs a client or protocol context. The evidence above supports more than one constraint. An exact release-by-release table would require additional client manuals or reproducible tests; this guide does not infer those missing results.
Why did animated icons sometimes become still?
Adium’s instructions distinguish dragging a GIF file into its image well from choosing it through the image picker. The latter could discard animation, as could resizing an oversized image. A valid animated file and an animation-preserving import path were both necessary.
The archive serves the stored file itself. An animated original stays animated; a still copy that survived elsewhere remains evidence of that copy. The frame count on the permanent record helps distinguish them.
GIF, JPEG, and transparency
GIF suits limited palettes and frame-based loops; JPEG suits still photographic images. Their existence in a collection does not prove identical support across clients. Gaim’s compatibility advice favors these two formats.
Transparency was also an intentional design choice: the Neopets editorial describes adding transparent borders while fixing file sizes. A transparent edge lets a character sit against the surrounding interface. It should be preserved as part of the file, even when a modern gallery displays it on a different background.
How did one-click installation work?
Webpages could hand an icon request to an installed messenger through an aim: link. The Depeche Mode download page tells visitors to launch AIM, click an icon, and accept the confirmation. The page also offers a different route for message-board profiles: copy the image URL.
This depended on software that understood the link. It was not a feature of an ordinary image file. Modern archive downloads save the image; they do not recreate AOL’s discontinued service.
Where did people see them?
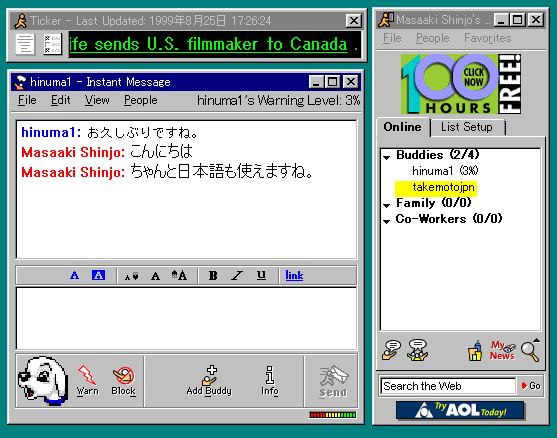
The exact placement varied with the client and its settings. This contemporary AIM 3.0 screenshot documents one Windows interface, rather than a universal layout for all versions.
Making a small icon now
Choose a 48×48 or 50×50 working canvas, inspect it at actual size, and make a deliberate choice about color, cropping, and motion. These are practical reconstruction choices, not a promise of compatibility with every historical client. See the step-by-step design guide for a compact workflow.